CrystalsCrafties

How to tips for Crafters and Etsy Shop owners

  • Cricut Tips and Tutorials
  • Canva
  • Inkscape
  • Etsy Tips and Tricks
  • Shop
  • Cart
  • My Account

in Cricut Tutorials

How to Connect Cursive Fonts (and how to curve them) in Cricut Design Space

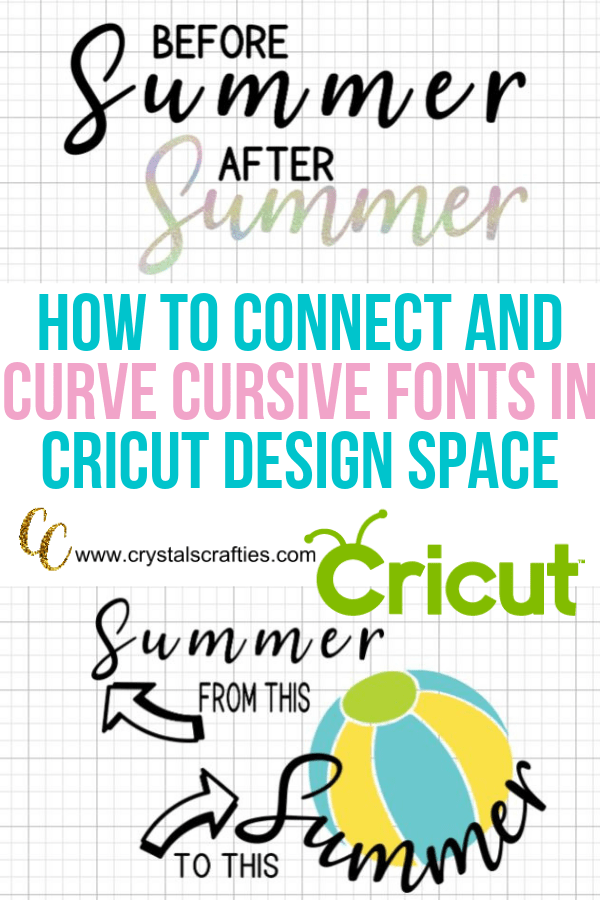
So you’ve downloaded one of those fancy cursive fonts and now you’re ready to use it in Cricut Design Space. You add your text only to find that the letters aren’t connected. Frustrating, right? It’s actually pretty easy to connect cursive fonts and I’ll show you how. As an added bonus, I’ll also show you how to curve cursive fonts…yay!

How to connect cursive fonts

There are 2 things you can do to connect cursive fonts in Cricut Design Space.

Method One: Letter Spacing

You can lower the letter spacing to get the letters closer together. Go up to the top menu bar and click into “Letter Spacing”.  Take it down to 0 and then go up or down from there to get the letters connected.  This will sometimes result in some of your letters overlapping while others are perfect. If this happens, you’ll want to move on to the second method of connecting cursive letters.

connect cursive text

Method Two: Ungroup and Move

If lowering the letter spacing has left you with some overlapping letters the next thing you’ll want to do is ungroup all the letters and move them closer together individually making sure none of them overlap. To do the just select your text and go to “ungroup” in the top right menu bar. This will separate each letter for you and you can work with them one at a time.

Finish it up

Once you have your letters placed where you want them you’ll need to weld everything together. If you don’t weld the Cricut will still cut each letter separately and you’ll have a big ol mess on your hands. To weld just drag a box around your whole word so it is all selected and go down to “weld” in the lower right menu bar. Click weld and your word will become one solid piece rather than all individual letters.

How to Curve Cursive Text in Cricut Design Space

If you want to curve your cursive text you can use the curve feature in the top menu bar however, I don’t recommend it. It won’t come out looking quite right. I suggest you curve your letters individually (kind of like you did to connect cursive fonts). Pull in a circle from the “Shapes” menu in the left menu bar or use whatever design element you want to curve the words around. I used a watermelon in my example.

Ungroup your letters again and start placing them around your circle or design. Decide where you want the middle to fall and place that letter first then work out to the right and left.  Get your word to where it looks somewhat centered on your circle or design. Once you’ve got a general placement for the letters, click into each letter individually and rotate it however much is needed for it to look natural then connect it to the letter next to it.  Continue working in the way until you have your word connected and curved around your circle or shape. Then don’t forget that super important step of welding it all together.  Make sure you only weld your word and not your circle too.

connect cursive text

The video below show how to do each of these things in a bit more detail and shows you a little bit of how to edit images you find in Design Space.  That’s all I have for now. I hope you enjoyed the tutorial and now you’re connecting cursive font like a champ.

Cricut Crash Course
 

My emails
rock.

Sign up below to get instant access to the Cricut Crash Course.

Thank you for subscribing!

Share this:

  • Click to share on Pinterest (Opens in new window) Pinterest
  • Click to share on Facebook (Opens in new window) Facebook

« Knockouts in Cricut Design Space…YES, you can still do it!
What is the Cricut Contour Tool and how do you use it? »

Archives

Are you crafty or do you have a unique talent? Do you want to learn how to use the Cricut or be your own boss by starting your own Etsy shop?

At Crystal's Crafties I provide detailed tutorials on how to use the Cricut and create other DIY crafts. I also provide step-by-step instructions and tips for creating an Etsy shop and being a successful Etsy seller. When I started with my Cricut and my Etsy shop I found that I was having to look through dozens of websites to get all the info I needed. There just wasn't a one-stop-shop for everything I needed.

That's why it's my mission to provide you with all the info you need to set up your Etsy shop and be a successful Etsy seller. And to get you crafting some of the DIY's you're going to want to sell in your Etsy shop.

If you're struggling with how to use the Cricut, with DIY crafts or your Etsy shop I think you'd really enjoy reading my blog.

  • About Me
  • Shop
  • Contact Us
  • Privacy Policy

Copyright © 2025 · Market theme by Restored 316

This website uses cookies to improve your experience. We'll assume you're ok with this, but you can opt-out if you wish.Accept Reject Read More
Privacy & Cookies Policy

Privacy Overview

This website uses cookies to improve your experience while you navigate through the website. Out of these, the cookies that are categorized as necessary are stored on your browser as they are essential for the working of basic functionalities of the website. We also use third-party cookies that help us analyze and understand how you use this website. These cookies will be stored in your browser only with your consent. You also have the option to opt-out of these cookies. But opting out of some of these cookies may affect your browsing experience.
Necessary
Always Enabled
Necessary cookies are absolutely essential for the website to function properly. This category only includes cookies that ensures basic functionalities and security features of the website. These cookies do not store any personal information.
Non-necessary
Any cookies that may not be particularly necessary for the website to function and is used specifically to collect user personal data via analytics, ads, other embedded contents are termed as non-necessary cookies. It is mandatory to procure user consent prior to running these cookies on your website.
SAVE & ACCEPT