Those retro stacked word designs are starting to pop up everywhere. I thought they were pretty awesome and wanted to start selling them in my Etsy shop so I pulled up my Inkscape and learned how to make the SVG file. Now that I know how to make stacked word SVG files I want to share my method with you. You’ll need Inkscape to do this but don’t worry, it’s free and an easy download. Just click this link and download Inkscape now. Once you have Inkscape on your computer you’re ready to go. Simply follow the steps below to make your own stacked word SVG files.

(This post contains affiliate links. This just means if you purchase something by clicking one of my links I may receive a small commission at no fee to you.)
Step One: Pull in your text
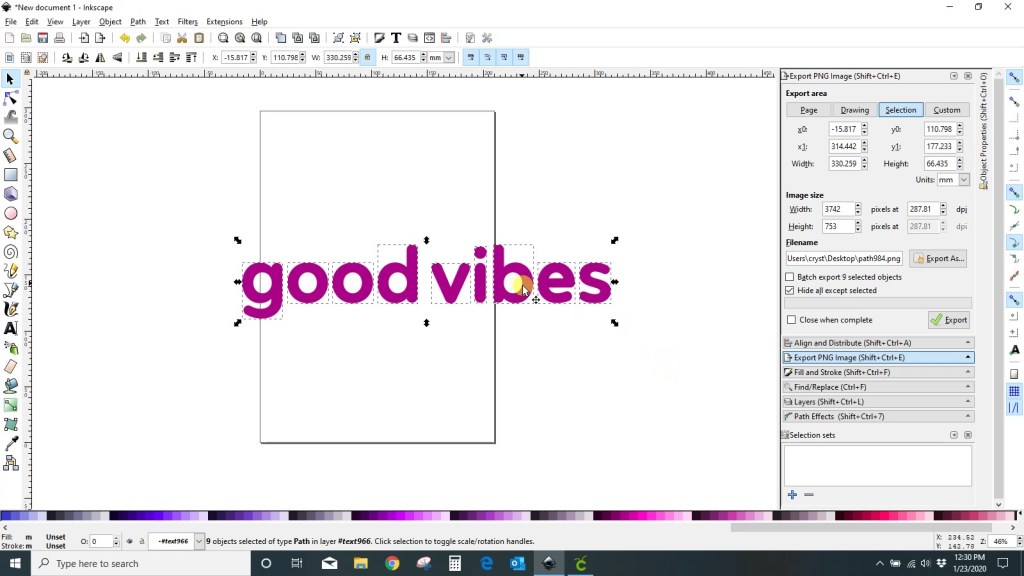
First you need to add in your text. In my example I used “Good Vibes”. To do this just click the “text” icon in your left menu bar and then click into the work area on your screen. Type in your word(s) and select your font. I used the Hank Rounded font from Creative Fabrica (it’s free with a subscription). Once you have your word typed in, click on the “selector” tool in the left menu bar and then click your word to “select” it. When your word is selected go up to “path” and then “object to path”. This will turn your word from a text file into a path which is what your cutting machine needs to be able to cut the word.

Now that your word is a path you will want to select each letter individually (just triple click into the letters while holding shift or drag a box around your whole word). When all the letters are individually selected, go to “Path” and then “Union”. This is like welding the word together in Design Space. These steps have to be followed or you will not be able to create the hollow effect.
Step Two: Hollow out your word
Okay so now you have your word and it is a united path. You need to add some shadow to it. To do this, select your word and then go to “Path” and “linked offset”. From here you can either drag the little diamond until you get a large enough shadow or you can hold “Ctrl” and click the right parenthesis as many times as you’d like to get the amount of shadow you want. The amount of shadow is totally up to you. Once you have your shadow where you want it, click in the middle of your word and drag out your original word (see pic below). You now have two layers; your original word and your shadow word.

Change the color of your original word by selecting the word and clicking on a color box at the bottom. You want to be able to see the two different layers. Now you need to make some duplicates. While your original word is selected hit “Ctrl” + “D” and it will duplicate. Select your shadow word and duplicate it. Move your duplicate words to the side of your work area. You’ll need them later.
Place your original word on top of your shadow word and center them. Select both words by dragging a box around them and then up to the align tool (see pic below) on your top menu bar. Center your words both vertically and horizontally. While they are both still selected go to “Path” and “Difference”. You’ll see the original word disappear and you’re left with a hollow shadow layer. That’s your first stacked word.

Step Three: create the stacked word effect
Now it’s time to layer your words. Select the shadow word you had off to the side and duplicate it again. (You’re going to duplicate several times. Just drag your duplicates off to the side because you’ll need them later.) Move your shadow layer under your first stacked word. Align it to where it has the layered effect you want (see pic below) and make sure you center it with your first stacked word. When everything looks right, drag a box around both words to select them and then go to “path” and “difference”. You’ll see the bottom shadow layer be removed from your first stacked word. This gives you the cutout you’ll need to put your next layer in.

Now it’s time to duplicate some more. Make a duplicate of both your original word and your shadow layer that you have over to the side. Take one of the original words and move it into the center of one of the shadow words. Center everything like you did before and go to “path” and “difference”. You now have your second stacked word. Move it under your first stacked word and change its color so you can see the difference and where it all lines up.
For your third stacked word just follow everything from step 3 again. You can do this as many times as you want to achieve the look you want. I just did 3 layers but you can keep going. I’ve seen as many as 7 before…
Step Four: add some fun text at the bottom
This step is totally optional but I think it’s a fun thing to add. In my example I added “Kind of Day” to the bottom. The font I used for this is Modelis Font from Creative Fabrica (free with a subscription). You’ll add this in the same way you did your first words. Just select the text icon and then click into your work area. Type in your word, choose your font and then turn the text into a path just like in step 1. It’s super important to make sure all text is turned into a path or the cutting machine won’t be able to read it.
When you have your design all done, select it all by dragging a box around everything and then group it all together. Just hit Ctrl + G or go to “Object” and “Group”. To save your design as a SVG just head over to “File” and “Save As”. Name your design and decide where you want to save it. It will automatically save as SVG. That’s it. You’re all done. You’ve created an awesome retro stacked word SVG.
